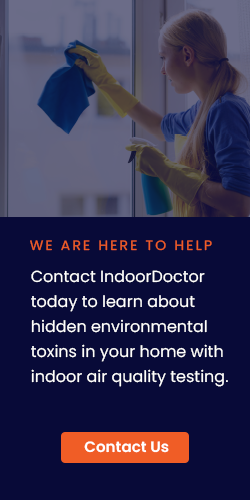
Deep Cleaning. One of the most beneficial things you can do for yourself and your family—especially when preparing for flu season—is to perform deep cleaning throughout your home. A deep clean is designed to not only catch those areas of dirt and grime that are often missed during weekly cleaning sessions, but also to completely disinfect the home, ridding it of bacteria, viruses, and toxic mold. Properly sanitizing your home in this way can significantly reduce your family’s risk of illness, as well as controlling allergy symptoms and helping to prevent asthma attacks.
Step One: Cleaning Household Surfaces
Surfaces are notorious germ carriers due to their frequent use (particularly for things like food preparation), so any deep clean should begin with fully disinfecting them.
Acrylic and glass surfaces should first be wiped down with a damp microfiber cloth (use color-coded cloths to avoid cross-contamination between bathroom and living surfaces), then washed with either a mild detergent and water solution if the surface is acrylic or with an ammonia and water solution if the surface is glass. Be sure to rinse with a clean damp cloth in order to rid the surfaces of residue.
For cleaning appliance surfaces, floors, and walls, you should use an all-purpose non-abrasive cleaner, with the exception of stove-top areas where baked-on food is present; to remove baked-on food, you should use either an abrasive cleaner or baking soda (which acts as a natural abrasive). Sinks and toilets should also be cleaned with an abrasive cleaner (ideally a quaternary cleaner; more on these below) in order to remove stains and bacteria, and you should be sure to scrub these areas gently but thoroughly with the appropriate instrument before rinsing.
For a detailed guide to cleaning various atypical surfaces, such as wood and marble, visit The Cleaning Institute.
Step Two: Properly Tackle Nasty Areas
Contrary to popular belief, bleach does not destroy the pathogens present in mold, nor does it prevent the mold from simply growing back, even when it is used at full strength. Bleach is also highly destructive to household surfaces due to its corrosive nature.
To remove mold from various surfaces within your home and prevent it from forming again, you should instead use what is known as a “quaternary ammonium cleaner”. These are not, it should be noted, ammonia-based solutions; instead, they are composed of various anti-microbial salts, known as quaternary ammonium chloride salts, which have been shown to eliminate the pathogens in mold (as well as killing many common viruses, such as the Norovirus, a virulent form of stomach flu). Called “quat cleaners” for short, these salts have been used as disinfectants in food processing for years owing to their efficacy in killing mold.
However, while quat cleaners have a long history of safe use when handled properly, they can be dangerous if one does not follow strict safety precautions. If you’re unsure of how to use quat cleaners or have an extensive mold infestation within your home, it is strongly recommended that you hire a professional mold removal service rather than attempting the task on your own.
If you do attempt to use quat cleaners to disinfect surfaces, remember to incorporate proper “dwell time” into your cleaning schedule. Dwell time is the length of time a disinfectant’s label states that it must remain wet on a surface in order to fully remove a broad range of pathogens (each cleaner’s dwell time is approved by the Antimicrobials Division of the United States Environmental Protection Agency so you can rest assured that it is accurate). In general, the dwell time for most quat cleaners is ten minutes, but you should always verify this before proceeding.
Step Three: Engage in Detail Cleaning
Any deep cleaning session should address all those “little things” which are frequently skipped over during weekly cleaning sessions. This includes moving appliances in order to clean under them, cleaning behind the toilet, cleaning out the refrigerator fully (as in scrubbing and disinfecting it, not just throwing away spoiled food items), and washing out the cupboards.
You should also make sure to clean out small appliances, such as your coffee maker and toaster. If you have a Keurig coffee maker you should be especially vigilant about mold growth as these machines frequently contain standing water, creating a damp environment which is ideal for mold and bacteria. To clean a Keurig machine, unplug and disassemble it, then wash the parts with warm, soapy water. Once you have reassembled the machine, mix one half white vinegar and with one half water, fill the water reservoir, and run the machine (without inserting a K-cup) until the mixture has been used up. Then run the machine again for one full cycle using only water.
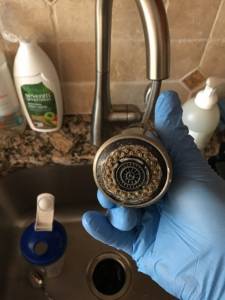
As a final note, don’t forget to clean out your sink aerators; even the most disciplined of cleaners often overlook these features, though they are also damp mold-friendly environments. To clean an aerator, fill a large glass bowl with white vinegar and soak the aerator head for at least 15 minutes, then scrub the holes of the aerator thoroughly with a clean toothbrush before rinsing with hot water.
Step Four: Hire a Professional Carpet Cleaner
At least twice per year, you should have your carpets cleaned by a professional. This will remove all of the ground-in dirt, festering bacteria, and allergens which vacuuming alone cannot take care of. It’s likewise a good idea to have your upholstery cleaned annually, particularly if you have pets.